If you’ve thought about roll up door installation, this guide will help you understand the key requirements and safety considerations. Consider the following:
Limited headroom – If you don’t have the clearance or headroom, this is where roll-ups really shine. Shutter doors can work with even less clearance, being incredibly compact once rolled up.
Easy access? Sometimes people ask, “Is it hard to open?” Roll-ups open smoothly, but in some cases, where people have raised concerns about aging, such as having to bend down to open the door, we recommend installing motors. It’s a one-click operation like a garage door and works great for accessibility.
Roll-Up Doors are pretty simple to install. This guide provides 3 steps to getting it done safely and correctly:
Step 1 — Which Roll Up Type?
- A “roll-up” usually means a sheet door (for sheds, self-storage, and larger opening applications)
- Heavy Duty Rolling Steel / Slat doors (like in a warehouse loading dock)
- Counter/shutter/security doors (business counters and residential or commercial security)
For roll-up sheet doors over 10’, a few things change. Wind ratings will range from 75MPH (12-14 feet), custom models can boost this 10-60 mph, but we strongly recommend a rolling steel door; the larger you go, or the more wind becomes a factor.
For security, roll-ups do have side locks and can have kick locks at the bottom. Rolling steel doors are a better option here, but shutter-style doors are the most secure option of the three.
Colors – We stock White and black. For recurring customers, we sometimes will stock a specialty color. You can also paint doors. If you use a de-glosser and a latex paint, it paints just fine. Several businesses do this, and it looks professional when done.
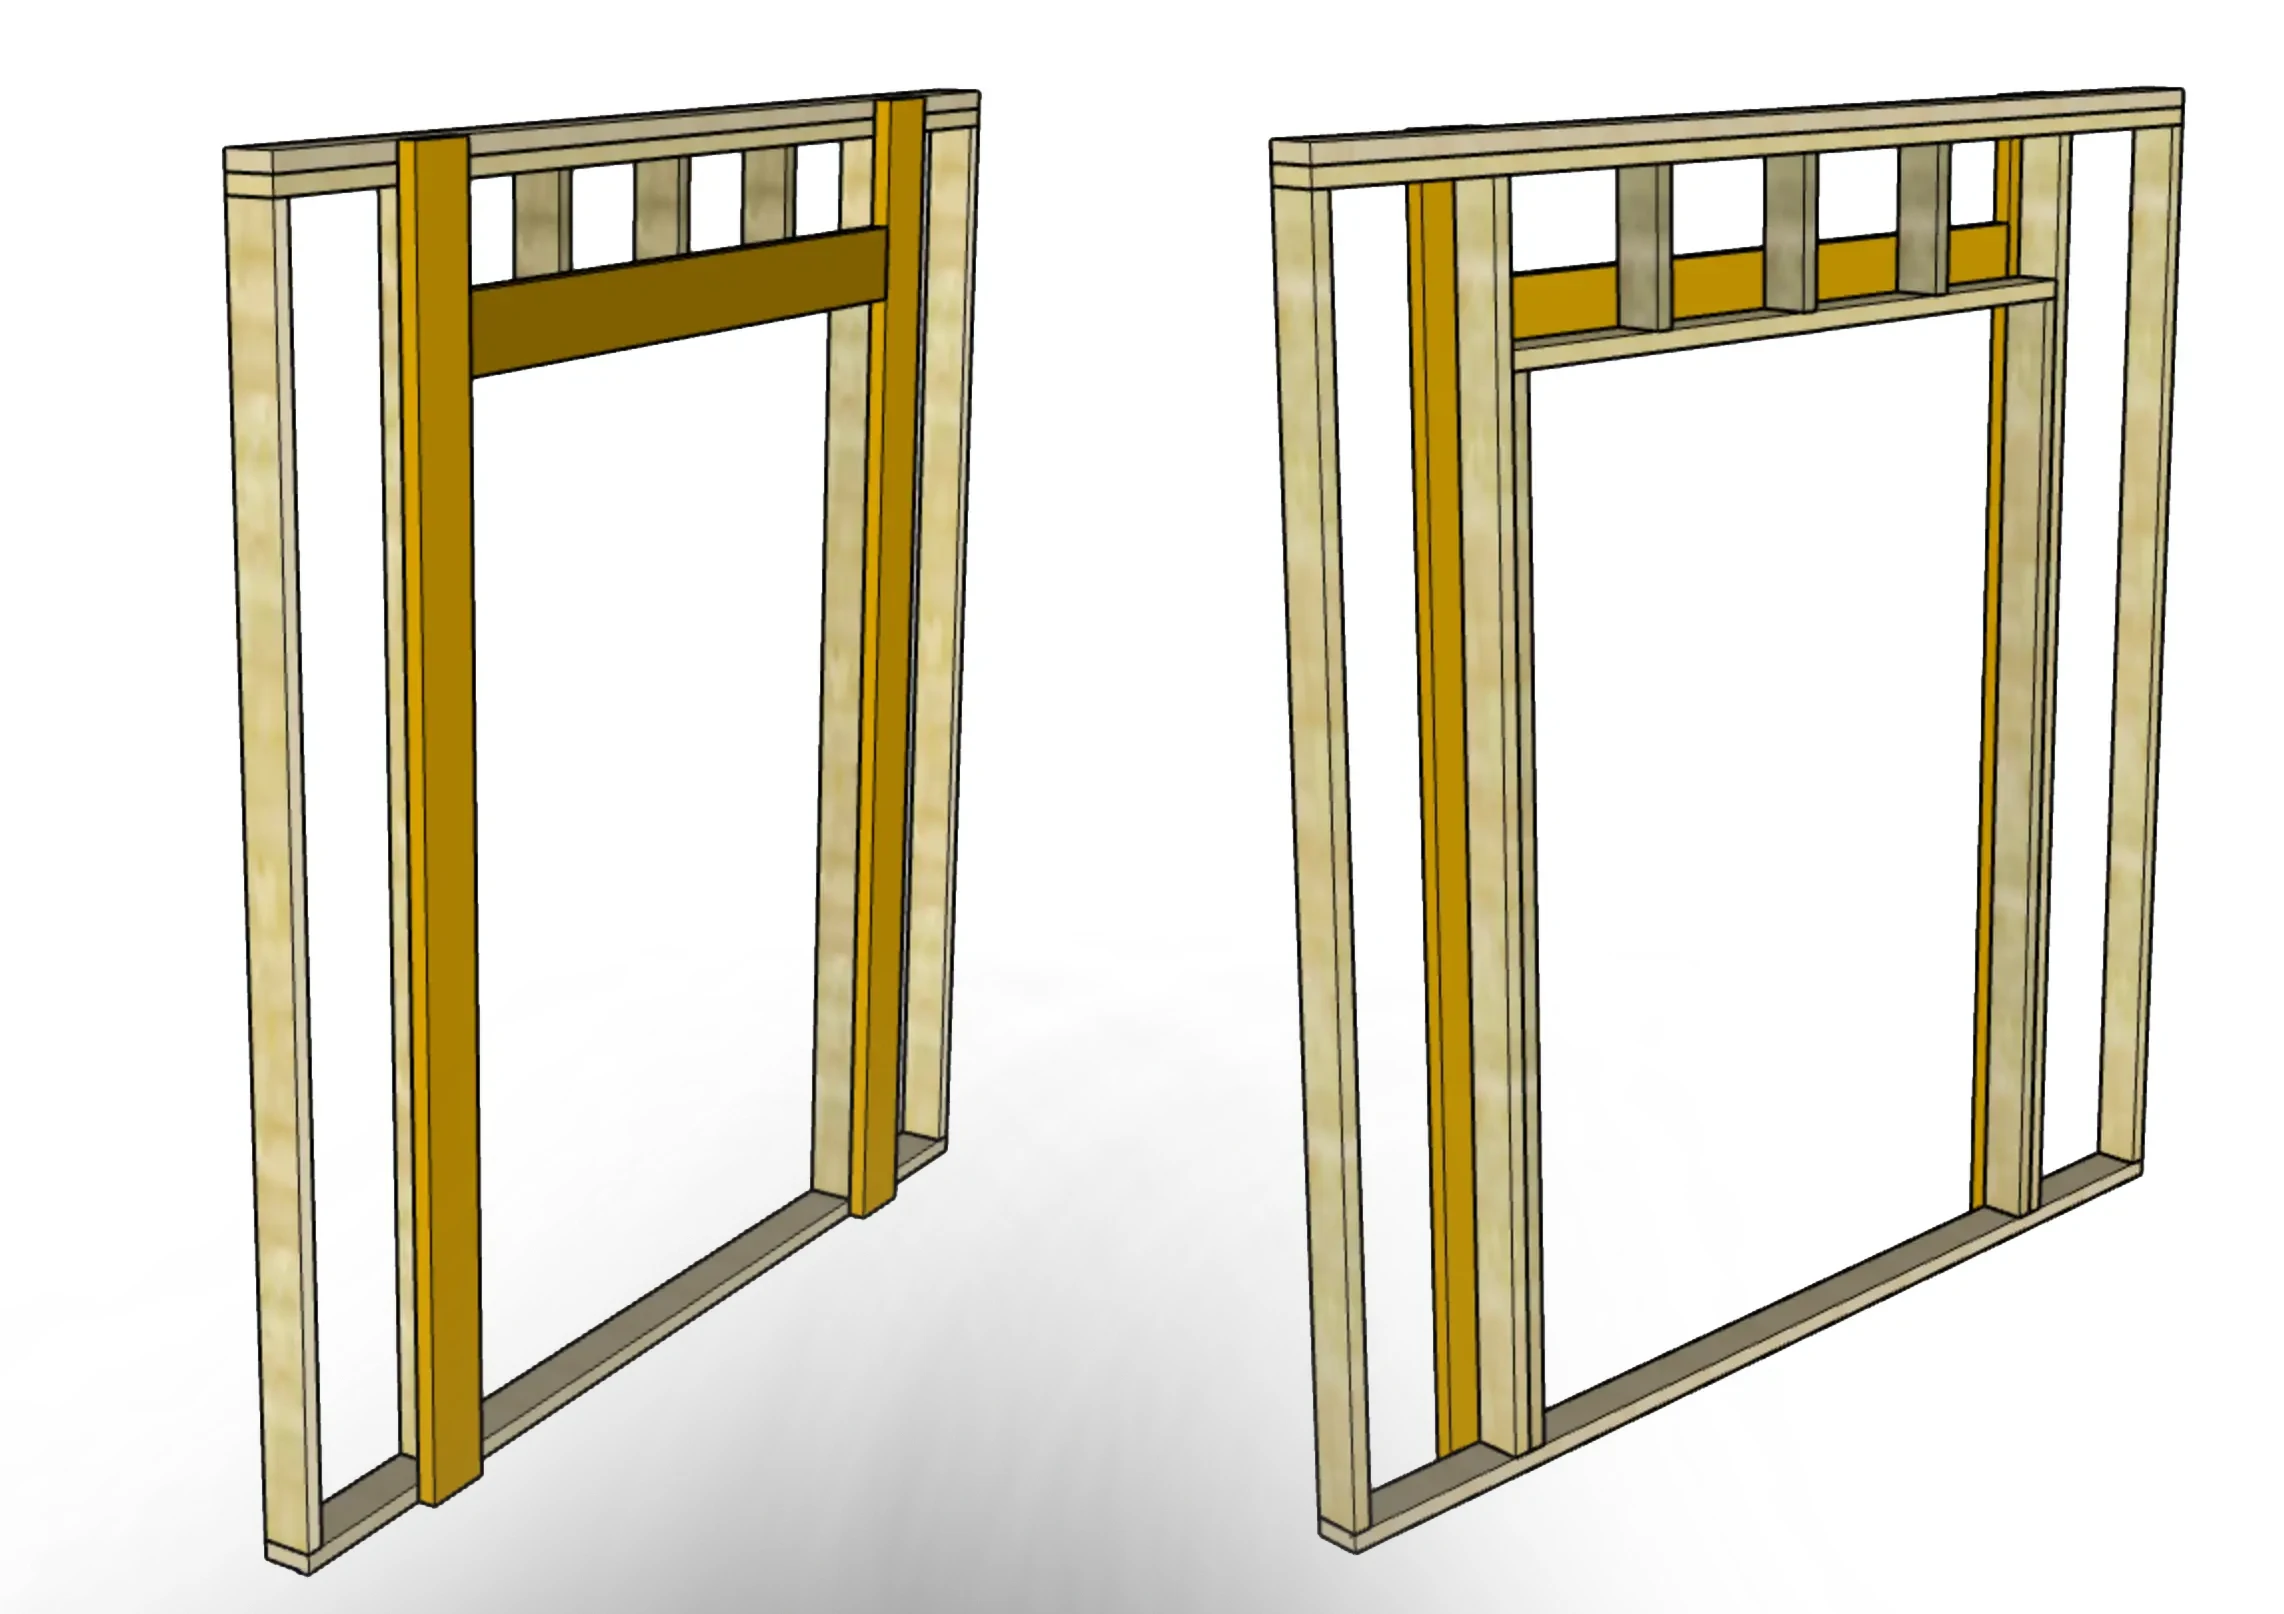
Step 2 — Framing and Clearance Requirements
The door is made to fit the opening. A 6×7 door (width first for roll-ups and garage doors) is going to have 3-4 inches extra clearance between each side, to fit into the guide tracks. That’s already accounted for in our guide specifications.
Think of your frame like a capital “H” where the top extends beyond the header. It’s an American football goal post, not a soccer goal. The “H” is because your mounting brackets mount above the header. You need 15″ of headroom minimum for proper clearance. Shutter doors need less space, though they cost significantly more than a roll-up/storage door.
Mounting Surfaces: We have hardware and mounting parts to mount to wood, metal, or concrete. We stock most common door sizes, and usually have mounting gear for any situation, but wood is clearly the most common, so it’s best to plan ahead for steel or concrete mounting requirements.
Step 3 — Installing
Safety First: Before beginning installation, review all safety instructions included with your door components. Wear appropriate safety gear and ensure the work area is clear.
For smaller doors, it’s actually easier to set up the door and track on the floor (or a sawhorse) than tilt it up against the wall and bolt it into place. Once it’s bolted into place, you roll the door two times toward yourself, standing on the inside of the door. This adds tension to the spring system. Then pull the door all the way down, attach all remaining parts, and you’re done.
For larger doors, a scissor lift and forklift may be necessary to install the door safely. We do these installs every day, but if you have lifts on site and we’re doing the install, let us know.
The average weight of a roll-up door is around 80 lbs. They range from 40-200 lbs for the most common models, but go much heavier. Rolling steel is significantly heavier, requiring additional safety precautions during installation.
Tips For A Better Installation
How “honest” is your opening? For larger openings, it’s important to measure height on the sides and center. Measure the width on top and bottom. The doors do have a seal on them, but if the ground isn’t level or the opening isn’t square, let us know so we can adjust the installation guide accordingly.
Spring Tension Adjustment: Some stops prevent the door from rolling too high and losing tension. These are not made for throwing the door up very fast and hard. You can reinforce them, though. Either with an extra screw (you’ll have to drill a hole), or maybe experiment with it. It’s not that common, but when there is a fumble with door care, this is the one we see most. The sliding nature is unique, and people like it. So every once in a while, someone gets the door and likes to slam it open. Just look at how your stop is mounted, and you’ll get a quick feel for this. It’s not weak, but it’s not made for slamming. But you can reinforce it. If you need to adjust the spring tension after installation, follow the instructions carefully for safety.
Mounting to steel? Depending on the door size, this can involve different types of plates and brackets. The box will usually come with detailed instructions for these mounting components, but if you need help, give us a call. We can either walk you through it on the phone or show you in person how to mount it properly. Different mounting surfaces have different requirements, so consult the installation guide for specific bracket types and parts needed.
Motors and Operators
This one is tricky. Different doors. Different motors. Not all components are compatible. If we’re doing the install for you, it’s cheaper to have us do the motor with the door install from the start. Otherwise, you often have to take the door down to install the motor. Some door barrels can be modified to work with certain motors, but this requires careful adjustment and following safety instructions.
Some motors only support a certain sqft. and/or height limit for roll-up doors. It’s not only important to follow these requirements, but we recommend erring on the safe side and choosing the bigger motor a little earlier. These motors do the job and last, but because roll-ups have more friction than a typical garage door, we just lean on the better motor as you near the limits of the smaller models. Proper motor operation depends on correct installation and spring tension adjustment.
Final Thoughts About Roll Up Door Installation
Roll up doors are a great option when you don’t have a lot of headroom, clearance, or need something easy to install. This guide has covered the essential requirements and safety considerations for successful installation. Whether your roll up door installation includes a basic sheet door for a shed, needs a heavy-duty steel door for a warehouse opening, or extra security provided by a shutter door, it’s important to select the right door for your needs and follow all safety instructions.
Installing smaller doors is manageable for most customers who follow the guide and safety requirements, but the correct installation of the larger doors includes precise mounting, proper bracket installation, spring tension adjustment, and calibration of all components. If you’re thinking about connecting or installing a motor for easier operation, plan for it before installing the door so you don’t have to take the door down later to try and fit everything in.
Our roll up door installation experts do this day in and day out, so let us take the hassle off your shoulders. We provide comprehensive instructions, all necessary parts, and ensure proper clearance, mounting, and header installation for safe, reliable operation. Contact us today for a complete installation guide tailored to your specific opening requirements.